AIST2220 TechPrac02 Specs
-
25 pts - Create a basic HTML table
Note: Please create this table 'manually' using just an editor like VS Code to help instill HTML table techniques. Working with HTML tables can get tedious and error prone, and moving forward we'll use a table formatting tool to help with the details but for this exercise, build it from the ground up.
Note: Complete this item before moving on to item II.A below.
Ref: (Video) A primer on HTML tables
Ref: (Tutorial) W3Schools HTML Tutorial section HTML Tables
At the bottom of your AboutMe.htm page add a section with a header 'Academic Plans' and a table like the following that shows your actual schedule for the academic year (Fall 2023, Spring 2024 and Summer 2024). It should be centered on the page (i.e., continue to use the centered layout established earlier).
You don't have to match the format exactly and feel free to change fonts, borders, column widths as you like. But some aspects that will be evaluated for grading include:
- A border around the table (borders within the table are up to you)
- Use of <thead> and <th> tags with colspan where needed for the table heading, term names, and column headings. The 'Course Schedule 'table heading should be centered over the table, column headings centered over the columns but term names left justified on their row with a color appropriate to the season as background for the row.
- The caption '2023-24 Academic Year' centered at the table's bottom.
- Any online courses (e.g., this term's AIST 2220) should the Day & Time and Location columns 'merged' (i.e., use colspan appropriately).
As usual, reformat the html, deploy AboutMe.htm to the root folder of your web site, and be sure it is valid. I will check the actual deployment so nothing is needed in D2L.
-
40 pts - Work with an HTML table designer
Ref: The HTML Tables Generator is suggested for this exercise but use any tool or method you like.
Note: Complete item I above before beginning item II.A.
- Repeat the schedule table task above using a table design / generator tool; make at least two distinctive design changes from the original -- borders, fonts, colors -- so the two srenn't exact duplicates. Embed the new schedule in your AboutMe.htm document below the one you created by hand. Reformat and revalidate if needed.
Hint: To get the striped effect using the table generator above choose Theme, then a color, then horizonal stripes and close. [Example]
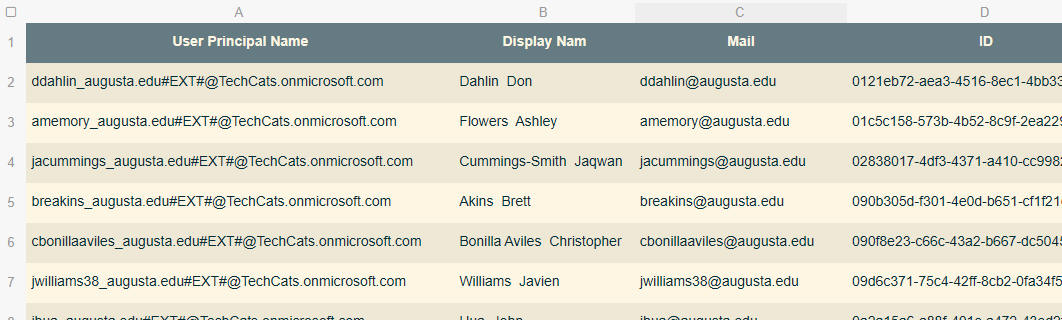
Use the .csv (Comma Separated Values) file AzureAD.csv as the starting point for an HTML table you develop but make the following adjustments (an example for reference)
- Any columns from the data that are blank for all rows (not including the heading) should be removed.
- Column headings should be changed
from camel casing to each word begins upper case and spaces between words
(e.g.,
userPrincipalNameshould beUser Principle Nameinstead), centered and in boldface. - Use a 'striped' theme so alternate rows get slightly different colors for readability.
Embed this table in a new HTML document named DataTable.htm which ends up deployed in the root folder of your web site, adding our standard comment about author and start date. HTML formatting and validity expected as well.
This item will be checked directly on the server so nothing to upload to D2L, but be sure they meet expectations for formatting, validation, commenting, use of
<title>, etc.. -
25 pts - HTML code element practice
Ref: W3Schools HTML Tutorial on HTML Computer Code
Develop an HTML document CodeDemo.htm which eventually gets deployed to the root folder of your course web site which describes some coding work -- scripting, programming, HTML -- you have done. Include a couple of headers (a title for the document and your name). In an introductory paragraph briefly introduce and describe your project -- why you did it (e.g., a course, work assignment, learning a new technique) and the basic requirements for what you needed to produce. In two or three subsequent paragraphs include the code (or part, if it was voluminous) and briefly explain what the code you developed does. Include an example of user input (data entry, command line execution, entering a URL) and resulting output. Along the way, use appropriately
<kbd>,<samp>,<code>,<var>and<pre>tags described in the tutorial.This item will be checked directly on the server so nothing to upload to D2L, but be sure they meet expectations for formatting, validation, commenting, use of
<title>, etc.. -
35 pts - A peek at the server side
Ref: (Video) A peek at IIS
Ref: (Guide) A Peek at IIS Management
Using the guide and video references for this assignment item, complete the three server tasks outlined:
- Change your site's default landing page to AboutMe.htm
- Develop a 'kinder' HTML page for a 404 not found error and adjust your web site so that page appears when a user requests a resource that's not there
- Change your site to require SSL; anyone visiting via HTTP (and not HTTPS)
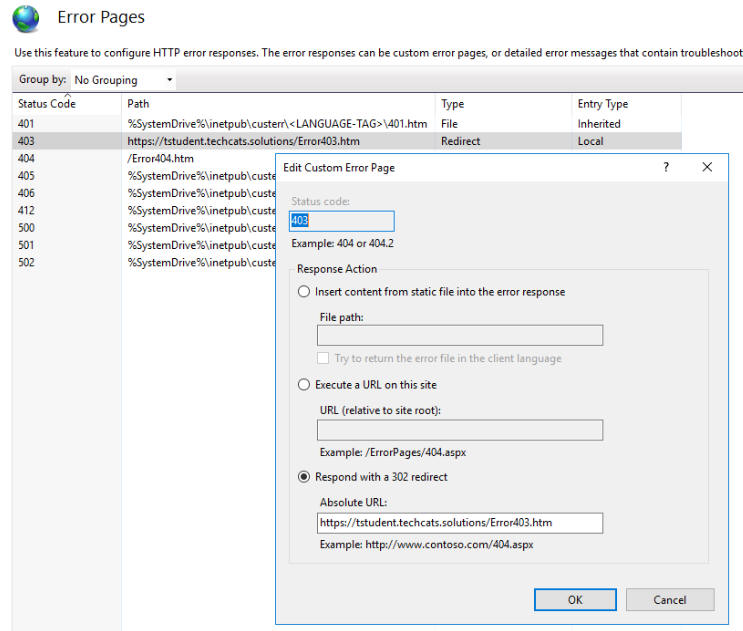
- Develop a 'kinder' HTML page for a 403 Forbidden error and adjust your web site
so that page appears when a user makes a forbidden request (e.g., tries
to access via HTTP after making the change above.
Addendum: I discovered (thanks Sean Brown, a student in class) that since we now require SSL to get to the site, if someone visits with just http: the server can't render the custom 403 error page like we set up for the 404 error because it would default to http: (the way the user made their request), so we get a generic 403 error page. The solution is to use a fully qualified url to the resource with https: included, something like this example screen cap (but you use your JagNetID instead of tstudent).
This item will be checked directly on the server so nothing to upload to D2L, but be sure they meet expectations for formatting, validation, commenting, use of
<title>, etc. in your HTML.
![[Example]](TPStripesExample.jpg)